Commands System
Here's the thing: we always think of "config files" and "scripts" as separate concerns. But they're not. Your deployment script is just configuring how your project deploys. Your development setup is configuring how your project runs locally. Your build process is configuring how your project gets built.
Axogen treats commands as what they really are: another type of configuration.
Because why should generating a .env file and running your database migrations
be handled by completely different systems?
So when I say "commands system," I really mean "the part of your configuration that does things instead of just defining values." Same unified approach, same type safety, same single source of truth.
The Basics
There are 5 different ways to define commands in Axogen, from dead simple to incredibly powerful:
import {defineConfig, cmd, group, liveExec} from "@axonotes/axogen";
import * as z from "zod";

export default defineConfig({
    targets: {
        // your targets...
    },
    commands: {
        // 1. Simple string command
        hello: "echo 'Hello, world!'",

        // 2. Direct function
        build: async (context) => {
            console.log("Building...");
            await liveExec("bun run build");
        },

        // 3. String command with help text
        dev: cmd({
            command: "echo 'This is a dev command'",
            help: "Start the development server",
        }),

        // 4. Advanced command with arguments
        echo: cmd({
            help: "Echo the input back to you",
            args: {
                input: z.string().describe("The input to echo"),
            },
            exec: (context) => {
                console.log(context.args.input);
            },
        }),

        // 5. Nested command groups (we'll get to this)
        database: group({
            help: "Database management commands",
            commands: {
                migrate: "npm run migrate",
                seed: "npm run seed",
            },
        }),
    },
});
Run any of these with:
axogen run hello
axogen run build
axogen run echo "Hello there"
axogen run database migrate

Simple String Commands
The easiest way to define a command:
export default defineConfig({
    commands: {
        start: "npm start",
        test: "npm test",
        build: "npm run build",
        deploy: "git push && npm run deploy",
    },
});
These just execute shell commands. Nothing fancy, but gets the job done.
Function Commands
Want more control? Use a function:
import {defineConfig, liveExec} from "@axonotes/axogen";

export default defineConfig({
    commands: {
        setup: async (context) => {
            console.log("Setting up the project...");
            await liveExec("npm install");
            await liveExec("npm run build");
            console.log("Setup complete!");
        },

        info: (context) => {
            console.log(`Running in: ${context.global.cwd}`);
            console.log(
                `Node environment: ${context.global.process_env.NODE_ENV}`
            );
            console.log(`Verbose mode: ${context.global.verbose}`);
        },
    },
});
Your function gets a context object with everything you need - current directory, environment variables, and your full config.
String Commands with Help
Use the cmd() function to add help text:
import {defineConfig, cmd} from "@axonotes/axogen";

export default defineConfig({
    commands: {
        dev: cmd({
            command: "npm run dev",
            help: "Start the development server with hot reload",
        }),

        "build:prod": cmd({
            command: "NODE_ENV=production npm run build",
            help: "Build the application for production",
        }),
    },
});
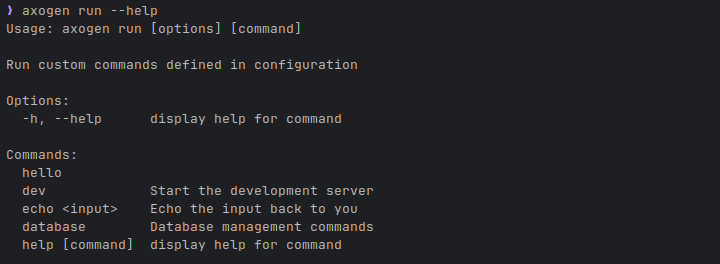
The help text shows up when users run axogen run --help.
Advanced Commands with Arguments
This is where it gets powerful. Define typed arguments and options:
import {defineConfig, cmd} from "@axonotes/axogen";
import * as z from "zod";
export default defineConfig({
commands: {
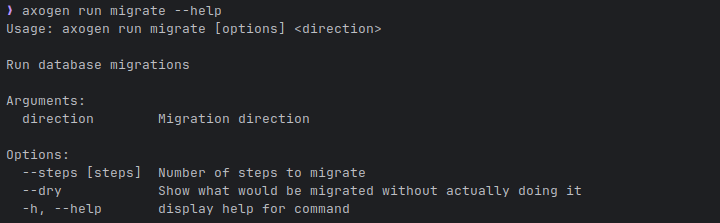
migrate: cmd({
help: "Run database migrations",
args: {
direction: z
.enum(["up", "down"])
.describe("Migration direction"),
},
options: {
steps: z.coerce
.number()
.optional()
.describe("Number of steps to migrate"),
dry: z
.boolean()
.default(false)
.describe(
"Show what would be migrated without actually doing it"
),
},
exec: async (context) => {
const {direction} = context.args;
const {steps, dry} = context.options;
let command = `npm run migrate:${direction}`;
if (steps) command += ` -- --steps=${steps}`;
if (dry) command += " -- --dry-run";
console.log(`Running: ${command}`);
await liveExec(command);
},
}),
deploy: cmd({
help: "Deploy the application",
args: {
environment: z
.enum(["staging", "production"])
.describe("Target environment"),
},
options: {
force: z
.boolean()
.default(false)
.describe("Force deployment even if checks fail"),
},
exec: async (context) => {
const {environment} = context.args;
const {force} = context.options;
if (!force) {
console.log("Running pre-deployment checks...");
await liveExec("npm test");
}
console.log(`Deploying to ${environment}...`);
await liveExec(`npm run deploy:${environment}`);
},
}),
},
});
Use them like this:
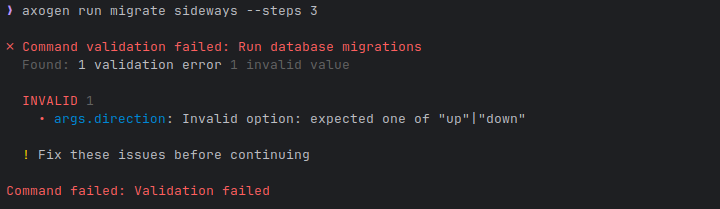
axogen run migrate up --steps 3
axogen run migrate down --dry
axogen run deploy production --force
TypeScript knows about your arguments and options. IntelliSense works. Runtime validation catches mistakes.
Nested Command Groups
Organize related commands with groups:
import {defineConfig, cmd, group} from "@axonotes/axogen";
import * as z from "zod";

export default defineConfig({
    commands: {
        database: group({
            help: "Database management commands",
            commands: {
                migrate: cmd({
                    help: "Run database migrations",
                    exec: () => liveExec("npm run migrate"),
                }),

                seed: cmd({
                    help: "Seed the database with test data",
                    options: {
                        env: z.enum(["dev", "test"]).default("dev"),
                    },
                    exec: (ctx) => liveExec(`npm run seed:${ctx.options.env}`),
                }),

                backup: group({
                    help: "Database backup operations",
                    commands: {
                        create: cmd({
                            help: "Create a database backup",
                            args: {
                                name: z.string().describe("Backup name"),
                            },
                            exec: (ctx) => {
                                console.log(
                                    `Creating backup: ${ctx.args.name}`
                                );
                                return liveExec(
                                    `pg_dump mydb > backups/${ctx.args.name}.sql`
                                );
                            },
                        }),

                        restore: cmd({
                            help: "Restore from a backup",
                            args: {
                                name: z
                                    .string()
                                    .describe("Backup name to restore"),
                            },
                            exec: (ctx) => {
                                console.log(
                                    `Restoring backup: ${ctx.args.name}`
                                );
                                return liveExec(
                                    `psql mydb < backups/${ctx.args.name}.sql`
                                );
                            },
                        }),
                    },
                }),
            },
        }),
    },
});
Now you can run:
axogen run database migrate
axogen run database seed --env test
axogen run database backup create "before-migration"
axogen run database backup restore "before-migration"
The help system is automatically generated for all levels:
axogen run --help # Shows all top-level commands
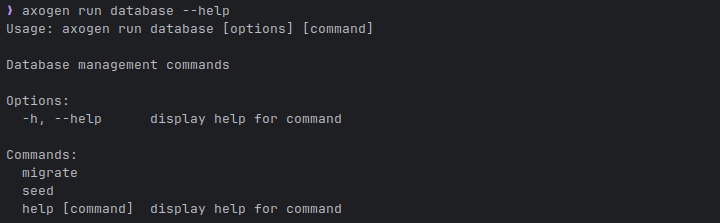
axogen run database --help # Shows database subcommands
axogen run database backup --help # Shows backup subcommands
Accessing Configuration
Your command functions have full access to your configuration:
import {defineConfig, cmd, env, loadEnv} from "@axonotes/axogen";
import * as z from "zod";

const envVars = loadEnv(
    z.object({
        DATABASE_URL: z.string(),
        API_KEY: z.string(),
    })
);

export default defineConfig({
    targets: {
        app: env({
            path: ".env.production",
            variables: envVars,
        }),
    },
    commands: {
        deploy: cmd({
            help: "Deploy with current configuration",
            exec: async (context) => {
                // Access your targets
                const appTarget = context.config.targets?.app;
                if (appTarget) {
                    console.log(`Deploying with env file: ${appTarget.path}`);
                }

                // Access loaded environment variables
                console.log(`Database: ${envVars.DATABASE_URL}`);

                // Generate configs before deploying
                await liveExec("axogen generate");
                await liveExec("npm run deploy");
            },
        }),
    },
});
Helper Functions
Axogen provides helper functions for common tasks:
import {defineConfig, cmd, liveExec, exec} from "@axonotes/axogen";

export default defineConfig({
    commands: {
        example: cmd({
            exec: async () => {
                // liveExec - shows output in real-time
                await liveExec("npm test");

                // exec - captures output, returns it
                const result = await exec("git rev-parse HEAD");
                console.log(`Current commit: ${result.stdout.trim()}`);
            },
        }),
    },
});
What's Next?
Commands give you a powerful way to automate your project tasks. Combined with target generation, you can:
- Generate configs and immediately deploy them
- Run tests with the right environment variables
- Create complex deployment pipelines
- Organize all your project scripts in one place
Check out:
- File Loading - Loading existing configs with validation
- Secret Detection - Keeping your secrets safe
Your configuration files can trigger actions. Your scripts can be intelligent. Your deployment can be consistent.
That's the real power of Axogen.